Related to my last post, there is a great post over at 52 Kitchen Adventures with ways to use up leftover canned pumpkin puree:
50 Ways to Use up Leftover Pumpkin Puree
This is where I found the pasta recipe that inspired last night's dinner.

Showing posts with label recipe. Show all posts
Showing posts with label recipe. Show all posts
Wednesday, June 25, 2014


Gnocchi with Pumpkin, Parmesan and Bacon
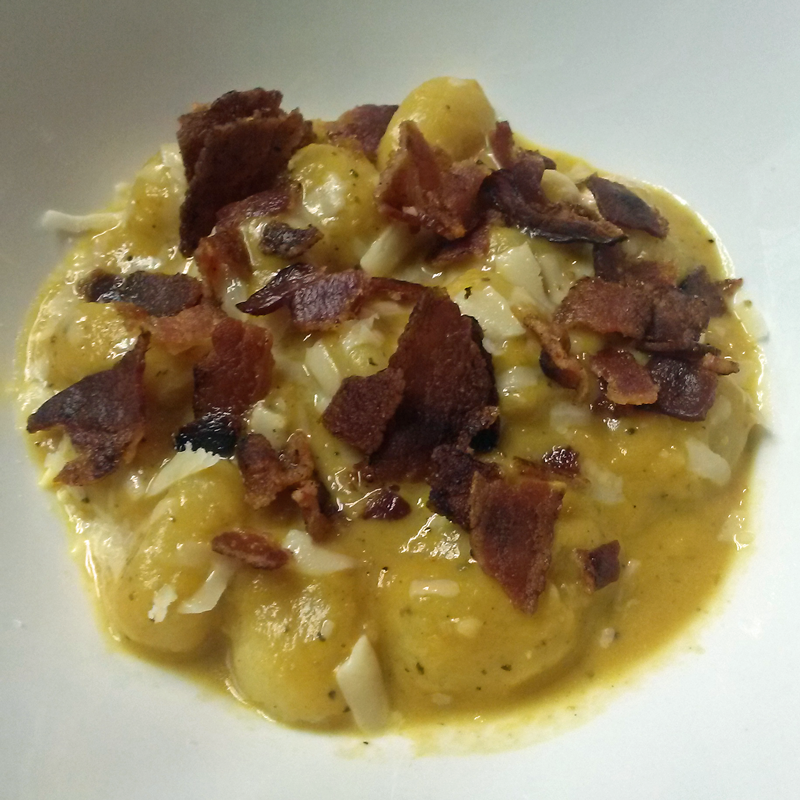
So, it is officially summer here in North Alabama, and it is hot. Actually, today wasn't so bad, because we had some light storms coming through to give us some cloudiness and nice breezes.
Anything pumpkin makes me think of Fall and hearty meals, but tonight I just needed to find something to fix for dinner in a pinch, and it was slim pickins' in my kitchen. So, a hearty, fall meal in the heat of summer it was.
I had three quarters of a can of pureed pumpkin (I keep it on hand now to mix with yogurt and cinnamon for my toddler...got to get some veggies in that kid somehow) and a few slices of bacon that needed to be used, so I headed to the computer to see if those things went together in any kind of way and hopefully with pasta or gnocchi (the gnocchi needed to be eaten soon too). I found this pasta dish, and it set my mind a whirl, so I headed into the kitchen to start whipping up some food.
When I told my husband what I was planning to make, he made a horrible face. I guess pumpkin isn't his thing. Now, if you aren't a pumpkin lover, never fear. Honestly, I don't like the taste of pumpkin straight up either. I usually only eat it as a pie or mixed with cheesecake around Thanksgiving. Except for the color of the sauce to give it away, you wouldn't know this was a pumpkin-based sauce. Great, comforting meal complete with a veggie, but even better because you can't really taste the vegetable.
Thanks to Tastefully Simple's Garlic Garlic and Onion Onion seasonings, I didn't have to chop a thing!
 |
| Pumpkin sauce before adding the cream and cheese (adding some more broth to this would make a yummy soup) |
Gnocchi with Pumpkin, Parmesan and Bacon
Bacon, 4- 6 slices
Butter (just a pat)
Tastefully Simple's Onion Onion, about 1/2 tbs (or you could use about a 1/4-1/2 of an onion of your choice, chopped)
Tastefully Simple's Garlic Garlic, 1-2 tsp (or feel free to use some fresh garlic)
Smoked Paprika, just a pinch
Ground and dried chipotle pepper, just a pinch
Dried sage, 1/2-1 tsp
Dried thyme, 1/8-1/4 tsp
Dried basil, just a wee pinch
Sherry cooking wine, just a splash (um, I guess about a tbs or so)
Water, about 1/4-1/2 cup
Better than Bouillon Chicken Base, 1-2 tbs (feel free to use chicken stock or broth instead)
Water, about 1/2 cup (to mix with chicken base)
Pureed pumpkin, about a cup or so (I used 3/4 of a standard can)
Package of gnocchi (found on the pasta aisle)
Parmesan cheese, finely grated (about 1/4 cup)
Heavy cream, about a tbsSalt and black pepper to taste
Cook the bacon in a large pan until crispy and set aside. You will leave some of the bacon grease in the pan to cook with, but if you think there is too much, just use some paper towels to blot some of it up out of the pan.
Turn down the heat to medium-low and add a pat of butter to the bacon grease. Add the Onion Onion through the dried basil and stir. Let the seasonings heat up gently in the pan for a few minutes (mine took on a nice, golden color).
Add a splash of sherry cooking wine to deglaze the pan; I used a silicon whisk to get all the yummy bits from the bottom of the pan. Increase the heat a little and add the water and Better than Bouillon Chicken Base. Stir well. Add the pumpkin and stir again. I let mine simmer for 20-30 minutes.
While the sauce is simmering and getting very yummy, cook the gnocchi according to the package directions.
Add the Parmesan cheese to the sauce and stir thoroughly until the cheese melts. Add the cream and stir. Season to taste with salt and pepper and serve warm, adding the crumbled bacon on top with each serving and a little more freshly-grated Parmesan. Enjoy.
Saturday, December 28, 2013
Pasta with Pecan and Broccoli Pesto

Pecan and Broccoli Pesto? Yes, and it was quite tasty!
Following all the Christmas food this week, I was craving Chinese food. Then I was sick of that tonight and wasn't feeling well enough to go grocery shopping, so I had to come up with something to make out of what we had available at home. I knew I was going to make some type of pasta dish, and I didn't have much meat available to use (I found out after I started cooking that we had bacon...I'll use that tomorrow).
We have lots of pecans right now, so that I was going to put those in there somehow, and we have lots of frozen broccoli. I had one lemon left, plenty of cheese, and some pasta. I did my usual scanning over recipes online with some of these ingredients and came up with the pesto. Since I didn't use a whole lot of broccoli, we weren't really able to tell it was there. I roasted the pecans before adding them to the pesto mixture, and the nuttiness of the dish was divine and very filling. Whole wheat pasta of some sort would have paired nicely, but I was all out of it. The bucatini I used is like a thick spaghetti with a hole through the middle. It is the closest thing I've found to Pici, a traditional Tuscan pasta, while grocery shopping.
I had a few frozen shrimp left (pre-cooked...I should really pay more attention to labels these days), so I heated some butter in a pan and tossed the thawed, pre-cooked shrimp for a minute or so and served those with the pasta. The sweetness of the shrimp went nicely with the nutty pasta. This dish may seem a little complicated, but it came together rather quickly. My husband approved; however, my two-year-old son wouldn't even try it. He settled for Chef Boyardee. *sigh*
Ingredients:
Pecans (I used whole pecans...from my freezer)
Pasta of your choice (I used Bucatini...from Giada Laurentis' brand at Target)
Extra Virgin olive oil
1-3 canned anchovies in oil (omit these if they totally gross you out, but I urge you to give them a try)Red pepper flakes (as many to satisfy your desired heat level)
Salt and black pepper to taste
1-2 cups broccoli florets (I used frozen)
1-2 tablespoons garlic, minced
Pecorino or Parmesan cheese, grated (I used Pecorino, but I was torn as to which to use)
Juice from 1/2 to 1 whole lemon
Zest of one whole lemonDirections:
1. Place your pecans on a pan (I line mine with foil) and toast them in the oven or toaster oven for about 10 minutes on low heat (about 200-250 degrees F).
2. Bring a pot of water to boil for your pasta. Cook the pasta according to the package directions.
3. While the pecans are toasting and the pasta is cooking, make the pesto. Heat a few 2-3 tablespoons of olive oil in a medium-large non-stick pan over medium to medium-high heat. Add the anchovies and stir until they break down into the oil. Add red pepper flakes (I added just a tiny bit at this stage, because I served this to my two-year-old. My husband and I topped off our pasta with an extra sprinkle or two right before we ate it), black pepper, and some salt and reduce heat to medium-low. Add the garlic and the broccoli and cook for 2-3 minutes (longer if your broccoli is still frozen...I thawed mine first).
4. Zest your lemon and place the zest aside. Using a blender, food processor, etc... blend the broccoli/garlic/anchovy mixture with 3/4 of your toasted pecans, juice of half the lemon, cheese and more olive oil as needed to aid the blending process. Set the pesto aside.
5. Chop the remaining pecans into small pieces and set aside.
6. When the pasta is finished cooking, use a coffee cup or some other heat-safe container to scoop out some of the starchy cooking liquid. Set this aside and drain the pasta.
7. Heat the pan you cooked the broccoli mixture in to medium-low heat, and then add the pasta, pesto (as much as you think you need...I had some left over), some of the starchy pasta water, and a little more lemon juice. Mix well.
8. Turn off the heat and add the lemon zest. Toss, and then taste to see if you need to add more salt or pepper.
9. Before serving, sprinkle the pasta with the reserved pecans you chopped (I like a little crunchiness to my dishes sometimes).
I served this with shrimp, but I think this would be lovely alongside some type of grilled while fish, such as Tilapia or Grouper.
I actually forgot to add the cheese to the pesto at first, and the pesto tasted pretty good without it. So, this would make a nice vegan pasta dish as well.
Monday, September 16, 2013
Homemade Eggplant and Salami Pizza

Well, sort of homemade. I start with a refrigerated dough (Pillsbury-brand thin crust). This is always so yummy. I don't know why I don't make this more often, because it is not difficult and not that time consuming.
For some reason that I can't remember, my husband and I started putting eggplant on our pizzas at home. Thinly sliced zucchini is good as well, but I just love the taste of eggplant. Eggplant and tomatoes are always a good combination. Add in some cheese and you've got a winning combo.
The best part of my homemade pizza is probably the sauce:
(I'm an add this and that sort of cook, so I rarely measure)
Splash of extra virgin olive oil
1/4-1/2 onion (white or yellow), chopped
Tomato sauce
Tomato paste
Roasted red peppers (I buy jars of already roasted peppers...cheaper and quicker), chopped
Crushed red pepper flakes (to taste)
Salt/freshly ground pepper (to taste)
Saute the onions in the olive oil until they are translucent. Add in some tomato sauce and paste and stir well and bring to a slight boil. Add in the roasted red peppers, pepper flakes, and salt/pepper. Boil for a minute or so and then lower heat and allow it to simmer for a few minutes.
Puree mixture and keep it warm until you are ready to add it to your pizza.
I like my sauce a little spicy. I think it works well since the pizza crust I buy has a slightly sweet taste.
For the pizza in the picture, I made half with eggplant and half with salami.
I baked the sliced/peeled the eggplant and then sprinkled it with salt and left it in a large colander for 15-30 minutes. I rinsed it off well and then baked it and the salami in a 375 degree oven for a few minutes before cooking the pizza crust. I wanted the salami a bit crispy and the eggplant to be cooked through (the pizza once assembled doesn't bake very long).
The crust pre-bakes for a few minutes, and then you pull it out of the oven and add your toppings. I put down the sauce, a little cheese (Italian blend), the vegetables/meat and then more cheese. I added mozzarella on top of the eggplant and feta on top of the salami.
You can also sprinkle red pepper flakes on top of the vegetable/meat instead of (or in addition to) putting them in the sauce.
Wednesday, August 10, 2011
Mango Smoothie
I had a little bit of a scare at my last doctor visit. Turns out I might not be doing as well healthwise/eating wise as I thought I was. My iron was really low and my blood sugar was really high. So, I thought I better go ahead and start watching my sugar intake and eating better overall. I'm hoping the sugar reading was incorrect. I'll find out for sure tomorrow when I go in for a more intensive test. As for the iron, I guess Baby Luke is really starting to grow and is taking more and more nutrients from me. I did feel him kicking a little higher on my belly early this morning.
At the beginning of my pregnancy, before the "morning" sickness got really bad, when I was just a little queasy first thing in the morning, I was making mango smoothies for breakfast. Yesterday I really wanted ice cream, but instead I made a mango smoothie. So yummy and it satisfied my ice cream craving and even gave me a little ice cream headache because I used frozen mango. Here's how I make it:
Mango Smoothie (serves one)
handful of frozen mango chunks
milk, 1/8-1/4 cup
plain yogurt, about 1/4 cup (I used 3 oz Greek low-fat yogurt)
1 pack Stevia, or you can use Splenda, some honey, or other sweetener of choice
drop of vanilla extract
ground flaxseed, about 1/2 tablespoon or so (great brain food for baby!)
Put mango and milk in a blender (I use a Magic Bullet for my smoothies) and puree/pulse until mixed a bit (you may have to add a little more milk depending on how frozen the mango is and how stubborn your blender is). Add the rest of the ingredients and blend until smooth. Enjoy. Mine is usually a bit thick at first so I eat it with a spoon like ice cream and then slurp the rest as it melts.
At the beginning of my pregnancy, before the "morning" sickness got really bad, when I was just a little queasy first thing in the morning, I was making mango smoothies for breakfast. Yesterday I really wanted ice cream, but instead I made a mango smoothie. So yummy and it satisfied my ice cream craving and even gave me a little ice cream headache because I used frozen mango. Here's how I make it:
Mango Smoothie (serves one)
handful of frozen mango chunks
milk, 1/8-1/4 cup
plain yogurt, about 1/4 cup (I used 3 oz Greek low-fat yogurt)
1 pack Stevia, or you can use Splenda, some honey, or other sweetener of choice
drop of vanilla extract
ground flaxseed, about 1/2 tablespoon or so (great brain food for baby!)
Put mango and milk in a blender (I use a Magic Bullet for my smoothies) and puree/pulse until mixed a bit (you may have to add a little more milk depending on how frozen the mango is and how stubborn your blender is). Add the rest of the ingredients and blend until smooth. Enjoy. Mine is usually a bit thick at first so I eat it with a spoon like ice cream and then slurp the rest as it melts.
Wednesday, July 20, 2011
A Taste of Florence: Yellow Pepper Soup
 When Lee and I were in Florence, Italy we ate at the Cibreo cafe. It is connected to the main Cibreo restaurant and serves some of the same food but is less expensive. A local gave us the tip to go there instead of the restaurant. She told us just to be there right when it opened because the cafe didn't take reservations. Fortunately eating somewhere in Italy right when they open for dinner isn't like rushing to a restaurant here right when it opens and having to eat at 4:30 PM. Cibreo cafe didn't open for dinner until 7:30 PM.
It was one of the best meals, if not the best, we ate during our two-week stay in Italy. I wanted to eat at Cibreo after reading great reviews in travel books and online. One thing it is known for is yellow bell pepper soup. I was really looking forward to trying it but it wasn't on the cafe's menu. I did have their tomato-bread soup and it was divine. It was a very thick pureed soup with loads of flavor. When I came back from Italy I did an online search for yellow pepper soup and found one that is supposed to be like Cibreo's. You can find it here.
I altered the recipe (I usually do alter recipes) a bit including omitting the spinach. It was delicious. It had a thick, creamy consistency like the tomato-bread soup I had at Cibreo and was filled with flavor. Because I omitted the spinach it was a beautiful yellow color. As you can see from the picture above, this time when I made it I added the spinach. It was not as visually appealing as my first batch, but man was it good! I also used one red bell pepper in addition to the yellow one because that is all I had on hand.
 There are two ingredients in this soup that may sound a bit strange: nutmeg and lemon juice. Don't even think about omitting these! You will be amazed at what a difference just a touch of both makes to this soup. I add them both at the end after all the other ingredients are pureed and heated again. I also use white onion instead of red and red potatoes instead of yukon gold simply because that is what I usually have in the kitchen.
Looking at the recipe I used as a guideline, I noticed they call for 6 cups of veggie broth. Don't use this much. I used just enough broth (this time I actually used vegetable stock) to reach the top of the vegetables.
The second time I made this soup (this was my third attempt) it was a massive fail. I had taken it to a dinner party too. I think where I went wrong was adding too much broth. It just diluted the flavor of the vegetables. I'm glad I've redeemed myself with this soup tonight. As you can see from the picture I had more tomato bruschetta. The basil had gone bad, but it didn't need it. The tomato was so delicious.
If I ever make it back to Florence, and I sure plan on it one day, I am definitely going to try to taste the yellow pepper soup at Cibreo. Until then, I'll keep making it at home. It will be a great soup to feed to the baby when he starts eating solid foods since it is not too spicy or hot and packed full of veggies.
Tomatoes and Peaches
 I am really enjoying both tomatoes and peaches this summer. For the last several nights Lee and I have started off our dinners with tomato bruschetta. It's like summer on a plate to me.
The picture above features bruschetta we actually grilled, but most nights I just toast up the bread in the toaster oven and get it in my mouth as fast as I can. It's real simple:
Slice some crusty bread and toast or grill it. If grilling it, use low heat and brush the bread with olive oil first. It only takes a minute or so on each side on the grill. Slice a good tomato (by good I mean a tasty one from your own garden or the farmer's market and not a supermarket tomato that tastes more like water than a tomato...heirlooms are great). I squeeze out most of the seeds before slicing. After slicing season with salt and pepper. Spread a thin layer of mascarpone cheese (ricotta, goat cheese, or a nice slice of fresh mozzarella would work too) on the toasted or grilled bread. Top with a slice or two of the tomato and then add some fresh basil and a drizzle of olive oil.

I have run across peach-tomato salsa in the past while searching the web but never tried it. Since I had tomatoes and peaches I needed to eat I decided to try it. It was pretty good. I'm not gonna lie...I was a bit skeptical. We ate it on top of grilled tilapia. I added onion to the salsa which turned out to be a mistake. Here is what I mixed together for the salsa minus the onion:
1 peach, peeled, pitted, and chopped
1 tomato, peeled, seeded and chopped (I used a yellow heirloom tomato)
1/2 to 1 jalapeno pepper, chopped finely ( I used a few rings from a jar)
1/4 to 1/2 tsp garlic, minced
1 tablespoon or so of chopped parsley (I'm sure cilantro would be very good as well)
drop of lemon juice
salt and freshly ground pepper to taste
Mix all the ingredients and place in the fridge until ready to eat. My tomato and peach were both very juicy so I had a very juicy salsa. It went very well with the grilled fish. Very light and summery.
What did I have for dessert that night? One yummy, juicy peach in all it's glory. I've been eating at least one peach a day. I bought them to grill and top with balsamic glaze and mascarpone cheese, but they are so good just as they are that I don't tamper with them.
Tuesday, June 28, 2011
Baked Feta in Tomato Sauce and a Simple Green Salad

Lee was out of town last night, so I was on my own for dinner and I was craving Italian food. I had some leftover Publix 5-grain Italian bread, plenty of tomato sauce (I buy it in bulk from Costco)and then I went back to Publix to pick up some fresh basil, feta cheese (pasteurized since I'm pregnant), spring salad mix, and some other goodies.
This was a really quick and yummy dinner to throw together.

Baked Feta in Tomato Sauce
Prepared tomato sauce (I used a little over half a 14 oz can)
Fresh basil, torn into small pieces (2-3 large leaves or equivalent in small leaves)
Red pepper flakes, 1/4-1 tsp depending on how hot you like it
Minced garlic, about 1/2 tsp
Salt and freshly ground pepper to taste
Small chunks of feta cheese, 1/4-1/2 cup
Extra-virgin olive oil, a tsp or so
Crusty bread for dipping
Preheat oven to between 375 to 400 degrees F or use a toaster oven like I did (no preheating required).
Place the first five ingredients in an oven-proof casserole dish (mine was about 3 1/2 to 4 inches wide) and stir. Place feta cheese on top of tomato sauce and drizzle with olive oil. Heat in the oven for 15 or 20 minutes. Stir and enjoy with pieces of crusty bread (I like to toast my bread for a few minutes on each side first).

This is one of my favorite ways to dress spring salad greens. The vinaigrette recipe below is appoximately what I made last night and was enough to dress 2-4 salads. You don't need much...just enough to lightly coat your greens.
Simple Green Salad
Juice of one large lemon
1-2 tsp red wine vinegar
Salt and freshly ground pepper to taste
Extra virgin olive oil, about 2 tsp
Spring salad mix
Capers
Freshly shaved parmesan cheese
Combine the first three ingredients in a small bowl (I usually mix my dressings in my 2-cup glass Pyrex measuring cup). While you whisk the first three ingredients, slowly drizzle in the olive oil. This is your vinagrette.
Top your spring salad mix with the vinaigrette, capers, and some freshly shaved parmesan cheese. Simple but delicious.
Tuesday, January 11, 2011
Sweet and Sour Tofu

I bought some canned pineapple the other day, and tonight I was determined to eat it with something. I had leftover tofu, rice, and half a red bell pepper in the fridge, so I searched the internet for sweet and sour tofu recipes.
I found and adapted this recipe from Eating Well.
I didn't have very high hopes for this dish, but I was pleasantly surprised. If you are looking for a replica to restaurant-style sweet and sour dishes, this is not it. However, I happily devoured a plateful. It was nice and satisfying but didn't leave me overly full and sluggish. And even better, it was quick and easy to make and helped me clear the fridge of leftovers.
After I started eating, I realized that I forgot one important ingredient in any sweet and sour dish--the sweet part. A lot of the recipes I found called for brown sugar, but it completely slipped my mind. I think the dish turned out sweet enough for my tastes. It picked up some sweetness from the pineapple juice and the corn syrup in the ketchup and pepper paste (pic below). If you like yours sweeter, feel free to add some brown sugar or other sweetener. Sweet and sour dishes usually don't have a lot of spicy heat added to them, but I wanted some kick to mine. If you don't want the heat, omit or limit the amount of pepper paste/sauce and the red pepper flakes. Since I added both, my dish came out pretty spicy.

My husband won't eat tofu, but he was envious of the great smells coming from the kitchen. I'll definitely make this again soon. Maybe I'll make it with shrimp so he can enjoy it as well. I need to increase my knowledge and skill when it comes to Asian cookery, especially Chinese, because short of going to PF Chang's, our options for really good Chinese are slim to none. Also, by eating it at home, I can control the ingredients and make sure it stays relatively healthy.

Sweet and Sour Tofu
1/2 tbs sesame oil
1 tsp garlic, minced
1 tsp fresh ginger, finely grated
1 8-0z can pineapple chunks in juice
1/2-1 tbs white vinegar or rice wine vinegar
1/2-1 tbs ketchup
1-2 tsp soy sauce
1-1 1/2 tbs pepper sauce (I used Sunchang Gochujang, a Korean fermented red pepper paste)
1 cup extra-firm tofu, cubed
1/2-1 red and/or green bell pepper, roughly chopped
salt and freshly ground black pepper to taste
1/4 tsp red pepper flakes
1/2-1 tsp cornstarch
1-2 tbs cold water
rice for serving (I used leftover jasmine rice)
Heat a medium-size nonstick pan over low heat and add the oil, garlic, and ginger.
Meanwhile, in a small bowl, whisk together the juice from the canned pineapple with the next four ingredients to make the sauce (if you are using sugar, whisk it in as well).
Increase heat of pan to medium-high and add the tofu, bell pepper, salt and pepper. Stir-fry for 3-5 minutes and then add the sauce. Stir to combine and heat until it starts to boil. Add the pineapple chunks. Mix cornstarch with cold water and add to the pan. Let the sauce return to a boil, stir, and then reduce heat. Heat for a couple of more minutes and then serve hot over rice (I added the rice directly to the mixture since I was using leftover rice and don't currently have a microwave).
Monday, January 10, 2011
Brownies from Scratch

Last night I decided that the incoming snow was as good a reason as any to attempt to make homemade brownies. And by homemade, I mean from scratch...no mix.
I found a good-sounding recipe over at Goodlife Eats and gave it a try.
The brownies turned out wonderful. They were chocolately and a little fudgy. For the chocolate chunks called for in the recipe, I cut up part of a dark chocolate bar. For the extract called for, I used 1/2 tsp of vanilla. I sprinkled half of the brownies with a little sea salt before baking them. This was a success, although I think I prefer the plain ones. I don't like much fuss when it comes to brownies.
Thursday, January 6, 2011
Hazelnut-crusted Tilapia with Lemon Basil Cream Sauce and Italian-style Green Beans

The other night Lee and I went to Carrabba's with friends, and I ordered the Trout Nocciola...trout crusted in hazelnuts and served with a lemon and basil butter cream sauce. On the side, I had Italian-style green beans. It was delicious. Lee had spaghetti with Italian sausage, but he kept stealing bites of my trout, so I decided to attempt the dish at home the next day for dinner. I substituted tilapia for trout because it was less expensive. I'll go ahead and tell you that it was a success!
The most difficult and frustrating part of the meal was preparing the hazelnuts. I went ahead and popped open the wine to help get me through it. This was the first time I've cooked with hazelnuts, and I did not anticipate them being so much trouble. I love hazelnuts, so it was well worth it.

First, I had to shell the darn things. The only type of nutcracker I own is for pecans, and it wasn't up to the task, so I pulled out the meat pounder. It worked well. I wound up placing the nuts right onto the countertop, and if I hit them with just the right force and at a slight angle, they would open up leaving a beautiful intact hazelnut. Be prepared for a mess if you try this. Hazelnuts were flying everywhere. The dogs and the cat quite enjoyed it.
After shelling them, I had to remove the thin, paperlike skins. I saw online that toasting them in the oven for 10-15 minutes at 350 degrees F was the key, so that's what I did. This releases some of their oil and gives them a great flavor too. After they came out of the oven, I used a kitchen towel to rub off the skins. Most of them came off easily, while a few didn't budge. If there was just a tiny bit of skin on one, I just scraped it off using my nails under the towel.
I pulled out the meat pounder again to crush them. I placed a few hazelnuts in the towel to keep them from flying off and pounded away. After a few pounds, I placed the nuts on a wooden cutting board and just pressed firmly with the meat pounder to achieve a finer consistency. Whew!

The wine I chose for tonight was Orvieto Classico. Orvieto is located in Umbria, which is adjacent to Tuscany. It was located among the Pinot Grigios, which was what I initially had in mind, but I decided to try something new. It was alright, but I think I prefer Pinot Grigio.

After I got the hazelnuts ready, I started making the sauce. I'm pretty handy with sauces, so this was a snap. Here's what I did:
Lemon Basil Cream Sauce
2 tbs salted butter
1-1 1/2 tbs freshly squeezed lemon juice
1 tbs vegetable stock (chicken stock or broth would work well also, I just had some leftover veggie stock handy)
1-1 1/2 tbs white wine
freshly ground black pepper to taste (optional...I add black pepper to everything)
1/2 tsp garlic, minced
1/2 cup heavy whipping cream
1-2 tsp lemon zest
1-2 tbs fresh basil leaves, torn
Melt the butter in a small pot over medium heat till slightly golden brown. Add the lemon juice, vegetable stock, wine, black pepper and garlic and cook on medium-low for 10-15 minutes or until reduced by about half. Whisk in cream until combined and reduce heat. Add lemon zest and stir. Sauce will thicken somewhat after it starts to cool. If it isn't as thick as you would like, you can thicken it up by first mixing some cornstarch or arrowroot (my favorite sauce thickener) with cool water and adding it to the sauce. If you add a thickener, bring the sauce back to a boil, and then reduce it again.
Add the basil to the sauce right before serving or just place it on top of the sauce when you plate (that's what I did). Since I still had to cook the fish and green beans, I left the sauce on the lowest setting to keep it warm.
(Serves 2-4)

Hazelnut-Crusted Tilapia
2-3 tbs extra virgin olive oil
1/2-3/4 cups toasted and crushed hazelnuts
1/2 cup panko (optional)
salt and freshly ground pepper to taste
1 egg white, whipped slightly
2 tilapia filets
1-2 roma tomatoes, seeded and cut into strips or chunks
Heat a medium-large size pan with lid on medium-high heat and add oil.
Dip fish into egg white and then into hazelnut/panko mixture, pressing so that it sticks. Place tomatoes into oil and stir. Add coated fish to pan and brown both sides. Reduce heat to medium or medium-low. Stir tomatoes and cover with lid. Cook for 5-10 minutes until fish is opaque throughout.
***I had to add additional oil to the pan, so next time I plan on adding some oil directly to the coated fish before placing in the pan.***
Serve fish hot covered with 1-2 tbs Lemon Basil Cream Sauce.
(Serves 2)

Italian-style Green Beans
1 tsp extra virgin olive oil
1 handful thin, French-style green beans (I buy them prewashed in bags)
1-2 roma tomatoes, seeded and roughly sliced or chopped
1-2 cloves pickled garlic, thinly sliced (use regular garlic if you don't have pickled)
salt and freshly ground pepper to taste
1/2 tbs or so balsamic vinegar (or other vinegar such as red wine vinegar)
1-3 tbs water, depending on how tender you like your green beans
Heat oil in medium-sized pan over medium to medium-high heat. Add beans, tomatoes, garlic, and salt and pepper. Heat for 1-2 minutes, tossing occasionally. Add vinegar to deglaze pan and stir. Add water and cover with a lid, but leave it cracked just a bit so it steams. Cook until desired tenderness and serve hot or even at room temperature.
(Serves 2)
***I usually steam my green beans in the microwave, but we have been without one for several months. We are getting one built in over the stove, but it is requiring custom cabinetry, so it has become a much bigger project than anticipated. Heating up leftovers isn't as quick without one.***
This turned out to be a delicious meal worthy of serving to guests. The next time I make it I'm going to try to lighten it up a bit by omitting the cream and making a broth and wine-based sauce instead. I'll let you know how it goes.
Tuesday, January 4, 2011
Hoppin' John
Lee and I are getting tired of black-eyed peas and collard greens. I made way too many peas. I put some up in the freezer, and we have been eating them for dinner since Saturday. Tonight is the last night (until we get in the mood again and pull them out of the freezer). To make them more than just black-eyed peas tonight, I decided to make some hoppin' john.
I haven't made hoppin' john in years. I think the last time I made it I was trying to be vegetarian. This time I diced up some of the leftover New Year's ham for the dish.
Sorry there are no photos for this recipe either. I have misplaced the charger to my good camera, and I can't use my other cameras because all the AA batteries need recharging.
Hoppin' John
2 tsp or so extra virgin olive oil
1/4-1/2 cup ham, finely chopped
1/2 medium white onion, finely chopped
1/2 cup green bell pepper, finely chopped
1/2 cup red bell pepper, finely chopped
2-3 tbs vegetable broth
1 1/2-2 cups cooked black-eyed peas
salt and freshly ground pepper to taste
Tabasco sauce to taste (or other hot sauce if absolutely necessary)
cooked rice for serving (I used jasmine)
Heat oil in a pan over medium-high heat. Add the ham and cook until browned a bit. Add onion and bell peppers, stir, and cook for 5-10 minutes until slightly tender. Add broth, peas, Tabasco, and salt and pepper and cook for an additional 5-10 minutes until heated through.
Serve hot over rice.
I haven't made hoppin' john in years. I think the last time I made it I was trying to be vegetarian. This time I diced up some of the leftover New Year's ham for the dish.
Sorry there are no photos for this recipe either. I have misplaced the charger to my good camera, and I can't use my other cameras because all the AA batteries need recharging.
Hoppin' John
2 tsp or so extra virgin olive oil
1/4-1/2 cup ham, finely chopped
1/2 medium white onion, finely chopped
1/2 cup green bell pepper, finely chopped
1/2 cup red bell pepper, finely chopped
2-3 tbs vegetable broth
1 1/2-2 cups cooked black-eyed peas
salt and freshly ground pepper to taste
Tabasco sauce to taste (or other hot sauce if absolutely necessary)
cooked rice for serving (I used jasmine)
Heat oil in a pan over medium-high heat. Add the ham and cook until browned a bit. Add onion and bell peppers, stir, and cook for 5-10 minutes until slightly tender. Add broth, peas, Tabasco, and salt and pepper and cook for an additional 5-10 minutes until heated through.
Serve hot over rice.
Sunday, January 2, 2011
New Year's Greens and Black-eyed Peas
Last New Year's Day I had people over to watch football and eat collard greens and black-eyed peas. Eating black-eyed peas on New Year's Day is a tradition in the South, because they are thought to bring prosperity for the rest of the year. Do I believe this? Well of course not, but it's a fun tradition and I really like black-eyed peas. The day and the meal was a success, so I hosted it again this year.
It was the last football Saturday until Fall 2011, so lots of games were on, including Bama's bowl game (Roll Tide!), so football was on all afternoon (another Southern tradition any day football is on). We had three tv screens set up in the living room with three different games going at once.
I had dinner ready a little after five, and the food was even better this year. In addition to the greens and peas, I made cornbread, two lemon pies, cran-apple cider, and Lee bought a ham from Apple Lane Farms. Eating pork is also supposed to bring prosperity in the new year. I think I will host New Year's Day at our house every year.
I didn't take any photos of the food or anything else yesterday, but here is how I fixed up my fixings:
Collard Greens
1-2 tbs extra-virgin olive oil (canola or veg. oil would be fine)
pork neck bones (I used 4 pieces)
1-2 tbs apple cider vinegar
3 bundles collard greens; washed well, tough centers removed from leaves, roughly torn or cut into 2-3 inch pieces (each bundle contained 3-4 stalks of collards)
water
salt and freshly ground black pepper to taste
green pepper sauce for serving (optional); this sauce is thin and vinegary and found in clear glass bottles that contain small, whole green peppers
Before you begin, you may want to turn on your kitchen fan and/or open a couple of windows. Once you add the liquid to the hot pot of oil and neck bones, some smoke is to be expected.
Heat a large pot on high and add the oil. Add the neck bones, browning them on the two largest sides (watch out for hot oil splatter). Add the apple cider vinegar, and scrape the bottom of pot to deglaze.
Add the collard greens, stir well, and add just enough water to cover them (the greens will quickly shrink, and you don't want too much water because it will dilute the flavor).
Add some freshly ground black pepper and bring to a boil if not there already. Turn down the heat, but keep the greens moving. Boil for at least 3 hours. They should be quite tender before eating.
Add salt to taste and more pepper if necessary and serve.
Black-eyed Peas
1-2 tbs extra virgin olive oil (canola or veg. oil would be fine)
pork neck bones (I used 4 pieces)
3 bags dried black-eyed peas, soaked in plenty of water overnight in the fridge and then rinsed and picked over to remove any bad ones that stand out
water
salt and freshly ground pepper to taste
Before you begin, you may want to turn on your kitchen fan and/or open a couple of windows. Once you add the liquid to the hot pot of oil and neck bones, some smoke is to be expected.
Heat a large pot on high and add the oil. Add the neck bones, browning them on the two largest sides (watch out for hot oil splatter). Add a little bit of water, sraping the bottom of the pan to deglaze.
Add black-eyed peas, then add enough water so that the peas are covered with a 1/2 inch to 1 inch water on top.
Add freshly ground pepper.
Reduce heat to medium-low. Watch the peas carefully, reducing the heat when necessary so that they do not come to a full boil (trust me, if the peas boil they fall apart too quickly and they will not be good).
Simmer for 2-3 hours.
Add salt to taste and more pepper if necessary and serve.
Lemon Meringue Pie
(the way my mom has always made it)
1 can sweetened condensed milk like Eagle Brand (I have been using the fat-free version lately, and no one including myself can tell the difference)
1/2 cup bottled lemon juice (I once used fresh and it just wasn't the same)
2 eggs, separated
1/4 cup sugar
pinch of cream of tarter
1 graham cracker crust pie shell, like Keebler brand
Preheat oven to 325 degrees F.
For the filling:
In a bowl, add the sweetened condensed milk, lemon juice and 2 egg yolks. Mix well ( I use a whisk and/or a spoon) and set aside.
For the meringue:
In another bowl, add 2 egg whites, sugar, and cream of tarter. Beat with a mixer until creamy and fairly thick.
Pour lemon filling into pie shell. Using a rubber spatula, spread the meringue on top, trying not to get the lemon filling mixed into it (this is the hardest part for me).
Bake directly on the oven rack for about 20-30 minutes. The meringue should be a light golden brown at its peaks.
Place on a cooling rack so filling can set. Cool as long as you can wait (often only 5-10 minutes for me) and serve. I like my lemon pie on the warm side, but if you want yours cool or cold, place in the fridge before serving. Definitely refrigerate any leftover pie.
Cran-apple Cider
(I throw this together every New Year's Eve or New Year's Day using my memory for a now lost recipe I got from a former professor and friend)
1 three-liter container cran-apple juice (This year I also added a couple cups of cranberry-pomegranate juice I had on hand)
1/2 cup orange juice ( I use my morning OJ, not freshly squeezed)
5 family-size black tea bags (more or less depending on how you like it)
water (optional) (to cut strength of cider if needed)
several cinnamon sticks
small handfull of whole cloves
sugar or sugar substitute to taste (I used a handfull of stevia packets this time and the cider came out nicely)
fresh orange slices for garnish (optional)
Heat all juice in a large pot until hot (not boiling), and then add tea bags. Steep tea for 15-20 minutes. Remove tea bags and add remaining ingredients (I placed my whole cloves in a gadget used for steeping fresh tea leaves so I wouldn't have to strain the cider as it was served...I left it in for 20 minutes, and then I refilled it with a new bunch of whole cloves for the remainder). I added a little water, about 1 1/2 cups to thin it out a bit (this is a taste and adjust as I go recipe).
Serve warm to hot.
I served mine to my guests from a crockpot, because I needed the stove for the greens and peas. I kept the remaining cider that wouldn't fit in the crockpot in the 3-liter cran-apple juice container and refilled the crockpot when needed (also a great way to travel with your cider).
Mexican-style Cornbread
(another treat I whip up without a proper recipe)
1 box Jiffy brand cornbread mix (usually found at the grocery store near the cake/muffin mixes and not with the cornmeal)
1 egg
1/3 cup milk
a little salsa, a tablespoon or two
a little cheddar cheese (I used one slice of packaged sharp)
green tabasco sauce (I used a little less than a tablespoon, and it didn't produce a cornbread that was very spicy, so I will use 1-2 tablespoons next time) (I usually use a tablespoon or two of chopped jalopenos from a jar of sliced jalopenos, but I was out)
a pinch of salt and freshly ground black pepper
Combine cornbread mix, egg, and milk in a bowl. Stir in remaining ingredients.
Follow directions on cornbread mix package to cook cornbread.
Serve warm.
It was the last football Saturday until Fall 2011, so lots of games were on, including Bama's bowl game (Roll Tide!), so football was on all afternoon (another Southern tradition any day football is on). We had three tv screens set up in the living room with three different games going at once.
I had dinner ready a little after five, and the food was even better this year. In addition to the greens and peas, I made cornbread, two lemon pies, cran-apple cider, and Lee bought a ham from Apple Lane Farms. Eating pork is also supposed to bring prosperity in the new year. I think I will host New Year's Day at our house every year.
I didn't take any photos of the food or anything else yesterday, but here is how I fixed up my fixings:
Collard Greens
1-2 tbs extra-virgin olive oil (canola or veg. oil would be fine)
pork neck bones (I used 4 pieces)
1-2 tbs apple cider vinegar
3 bundles collard greens; washed well, tough centers removed from leaves, roughly torn or cut into 2-3 inch pieces (each bundle contained 3-4 stalks of collards)
water
salt and freshly ground black pepper to taste
green pepper sauce for serving (optional); this sauce is thin and vinegary and found in clear glass bottles that contain small, whole green peppers
Before you begin, you may want to turn on your kitchen fan and/or open a couple of windows. Once you add the liquid to the hot pot of oil and neck bones, some smoke is to be expected.
Heat a large pot on high and add the oil. Add the neck bones, browning them on the two largest sides (watch out for hot oil splatter). Add the apple cider vinegar, and scrape the bottom of pot to deglaze.
Add the collard greens, stir well, and add just enough water to cover them (the greens will quickly shrink, and you don't want too much water because it will dilute the flavor).
Add some freshly ground black pepper and bring to a boil if not there already. Turn down the heat, but keep the greens moving. Boil for at least 3 hours. They should be quite tender before eating.
Add salt to taste and more pepper if necessary and serve.
Black-eyed Peas
1-2 tbs extra virgin olive oil (canola or veg. oil would be fine)
pork neck bones (I used 4 pieces)
3 bags dried black-eyed peas, soaked in plenty of water overnight in the fridge and then rinsed and picked over to remove any bad ones that stand out
water
salt and freshly ground pepper to taste
Before you begin, you may want to turn on your kitchen fan and/or open a couple of windows. Once you add the liquid to the hot pot of oil and neck bones, some smoke is to be expected.
Heat a large pot on high and add the oil. Add the neck bones, browning them on the two largest sides (watch out for hot oil splatter). Add a little bit of water, sraping the bottom of the pan to deglaze.
Add black-eyed peas, then add enough water so that the peas are covered with a 1/2 inch to 1 inch water on top.
Add freshly ground pepper.
Reduce heat to medium-low. Watch the peas carefully, reducing the heat when necessary so that they do not come to a full boil (trust me, if the peas boil they fall apart too quickly and they will not be good).
Simmer for 2-3 hours.
Add salt to taste and more pepper if necessary and serve.
Lemon Meringue Pie
(the way my mom has always made it)
1 can sweetened condensed milk like Eagle Brand (I have been using the fat-free version lately, and no one including myself can tell the difference)
1/2 cup bottled lemon juice (I once used fresh and it just wasn't the same)
2 eggs, separated
1/4 cup sugar
pinch of cream of tarter
1 graham cracker crust pie shell, like Keebler brand
Preheat oven to 325 degrees F.
For the filling:
In a bowl, add the sweetened condensed milk, lemon juice and 2 egg yolks. Mix well ( I use a whisk and/or a spoon) and set aside.
For the meringue:
In another bowl, add 2 egg whites, sugar, and cream of tarter. Beat with a mixer until creamy and fairly thick.
Pour lemon filling into pie shell. Using a rubber spatula, spread the meringue on top, trying not to get the lemon filling mixed into it (this is the hardest part for me).
Bake directly on the oven rack for about 20-30 minutes. The meringue should be a light golden brown at its peaks.
Place on a cooling rack so filling can set. Cool as long as you can wait (often only 5-10 minutes for me) and serve. I like my lemon pie on the warm side, but if you want yours cool or cold, place in the fridge before serving. Definitely refrigerate any leftover pie.
Cran-apple Cider
(I throw this together every New Year's Eve or New Year's Day using my memory for a now lost recipe I got from a former professor and friend)
1 three-liter container cran-apple juice (This year I also added a couple cups of cranberry-pomegranate juice I had on hand)
1/2 cup orange juice ( I use my morning OJ, not freshly squeezed)
5 family-size black tea bags (more or less depending on how you like it)
water (optional) (to cut strength of cider if needed)
several cinnamon sticks
small handfull of whole cloves
sugar or sugar substitute to taste (I used a handfull of stevia packets this time and the cider came out nicely)
fresh orange slices for garnish (optional)
Heat all juice in a large pot until hot (not boiling), and then add tea bags. Steep tea for 15-20 minutes. Remove tea bags and add remaining ingredients (I placed my whole cloves in a gadget used for steeping fresh tea leaves so I wouldn't have to strain the cider as it was served...I left it in for 20 minutes, and then I refilled it with a new bunch of whole cloves for the remainder). I added a little water, about 1 1/2 cups to thin it out a bit (this is a taste and adjust as I go recipe).
Serve warm to hot.
I served mine to my guests from a crockpot, because I needed the stove for the greens and peas. I kept the remaining cider that wouldn't fit in the crockpot in the 3-liter cran-apple juice container and refilled the crockpot when needed (also a great way to travel with your cider).
Mexican-style Cornbread
(another treat I whip up without a proper recipe)
1 box Jiffy brand cornbread mix (usually found at the grocery store near the cake/muffin mixes and not with the cornmeal)
1 egg
1/3 cup milk
a little salsa, a tablespoon or two
a little cheddar cheese (I used one slice of packaged sharp)
green tabasco sauce (I used a little less than a tablespoon, and it didn't produce a cornbread that was very spicy, so I will use 1-2 tablespoons next time) (I usually use a tablespoon or two of chopped jalopenos from a jar of sliced jalopenos, but I was out)
a pinch of salt and freshly ground black pepper
Combine cornbread mix, egg, and milk in a bowl. Stir in remaining ingredients.
Follow directions on cornbread mix package to cook cornbread.
Serve warm.
Tuesday, December 21, 2010
Huevos Rancheros

A few months ago I posted a recipe for Huevos, but I've tweaked it a bit since then. I've upped the amount of vegetables, adding more carrots, bell peppers, garlic, and onions. I also now add some tomato sauce along with the Cholula hot sauce.
After I sauted the vegetables, I cooked them in the sauce, covered, until tender. I then added the egg and covered again to make it really fluffy.

I just ate this for dinner, and it was delicious. It doesn't even need the chorizo or Soyrizo...of course, that makes everything better.
And for dessert...

Better-for-me Banana Split
Ingredients:
Fat-free plain yogurt
Stevia in the raw for sweetness
Vanilla extract
Banana
Ground flax seeds
Caramel sauce
This was yummy.
Friday, July 30, 2010
Huevos
I just made a delicious breakfast: Huevos Rancheros. It came in at only about 297 calories. I had a banana beforehand so my total caloric intake for breakfast was 387 g.
I've been doing very well this week with keeping my caloric intake at about 1500. My trainer did the math this morning and said I can go down to 1300 safely. I'll shoot for between the two for now. 1300 calories would come out to 3 meals at 400 calories each with a 100 calorie snack. I think this is also the flat belly diet.
I've been drinking Coke Zero instead of regular sodas and this week, and I discovered I like Pepsi Max (zero calorie as well) just as well as Coke Zero. I was going to splurge yesterday and have a small regular Coke with my happy meal at McDonald's, but a couple of small sips in I wasn't enjoying it like I thought I would so I put it down. I'm not going to waste my limited calories on something that isn't good.
I also keep plenty of SOBE Lifewater handy. These are calorie-free, contain vitamins, and use stevia as the sweetener instead of aspartame. My favorite flavors are Mango Melon and Yumberry Pomegranate. The Cherimoya punch is also very good. If you are a Hi-C fan/orange "drank" fan you will love the tangerine/orange flavor...I'm not a fan.
I have been tracking my calories and other nutritional info at myfitnesspal.com. They have a really good database of foods that includes brand names and restaurant foods. If you don't find exactly what you are looking for, they allow you to create a new listing. So hopefully most of the recipes I post from now on will also contain some nutritional data...approximate data at least. Here's the recipe for this morning's breakfast:
Huevo(s) Rancheros
1.5 tsp extra virgin olive oil
1/2 green bell pepper, julienned
small handful of baby carrots, julienned
1 tbs Soyrizo (veggie chorizo...I've only found it here at Wal-Mart and Kroger)
2-3 tbs salsa (I used some from a local restaurant: Casa Blanca)
Cholula hot sauce (or other hot sauce) to taste (I used about 1.5 tbs)
1 egg
salt/pepper to taste
3 Tostito's organic blue corn chips (optional)
Heat the oil in a nonstick pan over med-high heat. Add peppers and carrots and cook for 3-5 min stirring occasionally. Add Soyrizo, stir and cook until Soyrizo is hot. Add salsa and hot sauce, stir and cover. Let cook for an additional 3-5 minutes.
Make some room in your pan and add the egg and salt/pepper. You are pretty much frying the egg. Once I flipped mine I mixed it into the vegetable mixture a bit. Cook the egg to your liking and serve with the blue corn chips. It is very flavorful and filling. Plus, you are getting some of your veggies first thing in the morning.
Cal: 297 g; Carbs: 23 g; Fat: 16 g; Protein: 12 g; Fiber: 5 g
Monday, June 14, 2010
Blackberry and Baby Spinach Salad with Goat Cheese

Blackberries are one of the highlights of summer for me. Sure they taste good, but they also remind me of my childhood. My dad's parents owned a farm, which is still in our family, and we would go there almost every weekend.
Every June my mother, my grandmother and I would pick blackberries from around the fishpond and off the fence that separated a field of cotton from a dirt road. I would sit in the kitchen nibbling on the fresh berries as the two of them made blackberry jelly, which they would then "put up" into numerous jars. I would wait in anticipation the rest of the afternoon for dinnertime to come around so I could eat some of my grandmother's blackberry cobbler. It is still the best blackberry cobbler I have ever tasted. It is one of the few recipes of my grandmother's that I have. My Aunt Jimmy gave me a copy of the recipe at my bridal shower along with a recipe cardholder. One of these days I'll attempt to make it.
I got some blackberries from the farmer's market Saturday and last night I tried something a little different...a spinach salad with blackberries...and it was delicious. Lee really liked it also.
Blackberry and Baby Spinach Salad with Goat Cheese
Baby spinach
Plain goat cheese
Fresh blackberries
For the dressing:
Balsamic vinegar
Balsamic glaze (optional)
Honey
Salt
Freshly ground black pepper
Extra virgin olive oil
I rarely measure when I whip up a salad dressing, especially when I make it up as I go along. I just eyeball it to make sure I have enough for the amount of salad I'm making.
The basic formula is the same, though. Mix your acid (in this case the balsamic vinegar) and seasonings. And then, as you whisk that mixture, slowly drizzle in the oil. You have vinaigrette. Don't be scared of it. Just get in the kitchen and bang together some dressing.
I really wanted a sweet dressing, which this was before I even added any honey because the balsamic glaze is on the sweet side. If you don't have balsamic glaze, just use more honey. I think the sweet balances nicely with the spinach. Overall the dish was nicely balanced. The slight sweet tanginess of the berries and the lush, creaminess of the goat cheese was perfect. Yum.

I had another salad with goat cheese and fruit a few weeks ago, and it was equally delicious. There will be a lot more fruit, salad greens, and goat cheese in my future. It is a great summertime combination.
I had some romaine lettuce from the farmer's market and a few dried apricots left from another cooking adventure. I couldn't look at the apricots without thinking of the peaches and creme fraiche I had during my 2007 visit to Chez Panisse. So that led me to apricots and the creamy goat cheese.
Apricot and Goat Cheese Salad
Romaine lettuce, chopped coarsely
Dried apricots (rehydrated in water for about 30 minutes) or fresh apricots
Fresh goat cheese
For the dressing:
Apricot preserves
Dijon mustard or spicy brown mustard (just a little)
Red wine vinegar
Salt
Freshly ground black pepper
Extra virgin olive oil
Monday, November 30, 2009
Rainy Day Spaghetti

I love a big plate of spaghetti on a cold rainy night. I made this sauce a couple of summers ago after my mother-n-law gave us a variety of peppers from her garden. I had some Ragu Traditional Recipe spaghetti sauce in the pantry, so I thought I'd see what it would taste like with peppers. I really didn't expect it to come out good, but it did. My husband loves it. See, it pays to play around in the kitchen. The sauce has never tasted as good as it did the first time. My mother-n-law's peppers were the key. Last night I played with it further by adding some mushrooms. I think I'll add them from now on. Here's the recipe:
Ragu with Peppers
1 pound ground beef
1/2-1 tbs extra-virgin olive oil
1 large clove garlic, minced
1/2 medium onion, diced
1 green bell pepper, diced
1 med-large jalapeno pepper, diced
1 anaheim pepper, diced
8 oz button mushrooms, chopped coarsely (optional)
1/4-1/2 tbs red pepper flakes
Freshly ground black pepper (3-4 turns of the grinder)
13-oz jar Traditional Recipe spaghetti sauce from Ragu
1. Brown ground beef in a large skillet over medium-high heat. Remove from the pan, drain, and set aside.
2. Add olive oil to the pan. Then add garlic, onions, peppers, mushrooms, red pepper flakes, and black pepper to the pan. You may need to reduce heat to medium. Cook, stirring here and there, until onions are translucent.
3. Add beef back to the pan and stir. Add the spaghetti sauce, cover, and bring to a boil. Reduce heat and simmer for 20-30 minutes.
I serve mine over half whole-wheat and half regular spaghetti noodles and top it off with fresh parmesan cheese that I slice off with a vegetable peeler. The sauce tastes even better the next day.
Saturday, November 28, 2009
Black Bean and Pumpkin Soup
After the muffins, I still had plenty of puree left, so I decided to make some soup. I had seen recipes for black bean and pumpkin soup in the past, so I finally decided to give it a try. We always have cans of black beans in the pantry. They are one of my favorite foods.
I didn't follow a recipe for this soup; instead, I looked at several recipes online and then concocted my own using what I had and what sounded good. I do this a lot. I have so many cookbooks and cooking magazines, but I rarely follow a recipe verbatim.
My soup was good. I've always been pretty good with soup. Here is the best recipe I can give you at the moment. Due to my pinch-of-this-pinch-of-that-method, the measurements are approximations.
Black Bean and Pumpkin Soup
1 tbs extra-virgin olive oil
1 pat of butter (about 1/4-inch thick)
1/2 medium yellow onion, chopped
1/2-1 tbs minced garlic
1-2 tbs canned chipotle peppers in adobe sauce, finely chopped
1-3 tsp ground cumin powder
1/4- 1/2 cup cooked ham, cubed (we had leftovers from Thanksgiving)
1/4 cup beer (whatever's in the fridge)
2 15-ounce cans black beans (I used the whole can...you can drain and rinse if you want)
1 15-ounce can diced tomatoes
1-1 1/2 cups pumpkin puree
1 15-ounce can beef broth
15-30 ounces of water (I used my beef broth can to add enough water to make soup thinner)
Salt and freshly ground black pepper to taste
Sour cream for garnish, optional (I used fat-free sour cream)
1. Heat oil and butter in large soup pot (I used a 6-quart pot) over low heat. Add garlic and let sit for a few minutes to infuse garlic flavor in oil. Turn the heat up to medium, add onion, stir and saute until onion is translucent. Add chipotle peppers, cumin, and ham and stir.
2. Add beer to deglaze pan. Stir and scrape bottom of pot.
3. Add the next 6 ingredients, through salt and pepper, and stir. Bring to a boil. Reduce heat and simmer as long as you want (I usually let soups simmer at least 20 minutes).
4. Puree soup(I used my immersion blender), bring back to a boil, and simmer a few more minutes.
5. Serve warm topped with sour cream (optional).
I didn't follow a recipe for this soup; instead, I looked at several recipes online and then concocted my own using what I had and what sounded good. I do this a lot. I have so many cookbooks and cooking magazines, but I rarely follow a recipe verbatim.
My soup was good. I've always been pretty good with soup. Here is the best recipe I can give you at the moment. Due to my pinch-of-this-pinch-of-that-method, the measurements are approximations.
Black Bean and Pumpkin Soup
1 tbs extra-virgin olive oil
1 pat of butter (about 1/4-inch thick)
1/2 medium yellow onion, chopped
1/2-1 tbs minced garlic
1-2 tbs canned chipotle peppers in adobe sauce, finely chopped
1-3 tsp ground cumin powder
1/4- 1/2 cup cooked ham, cubed (we had leftovers from Thanksgiving)
1/4 cup beer (whatever's in the fridge)
2 15-ounce cans black beans (I used the whole can...you can drain and rinse if you want)
1 15-ounce can diced tomatoes
1-1 1/2 cups pumpkin puree
1 15-ounce can beef broth
15-30 ounces of water (I used my beef broth can to add enough water to make soup thinner)
Salt and freshly ground black pepper to taste
Sour cream for garnish, optional (I used fat-free sour cream)
1. Heat oil and butter in large soup pot (I used a 6-quart pot) over low heat. Add garlic and let sit for a few minutes to infuse garlic flavor in oil. Turn the heat up to medium, add onion, stir and saute until onion is translucent. Add chipotle peppers, cumin, and ham and stir.
2. Add beer to deglaze pan. Stir and scrape bottom of pot.
3. Add the next 6 ingredients, through salt and pepper, and stir. Bring to a boil. Reduce heat and simmer as long as you want (I usually let soups simmer at least 20 minutes).
4. Puree soup(I used my immersion blender), bring back to a boil, and simmer a few more minutes.
5. Serve warm topped with sour cream (optional).
Back to the Pumpkin

Well, my pumpkin pie cheesecake turned out ok. A little disappointing since I stayed up until 1 a.m. with it. I toasted my pumpkin seeds last night and they didn't turn out very good either. I think I may have let them sit out too long before toasting (48 hrs vs 24 hrs). I'll try them again next year. The photo was taken of the seeds before they were toasted or cleaned completely.

I had plenty of pumpkin puree left, so I tried to make muffins. Well, I thought I was going to make muffins, but the recipe was really for biscuits. It helps to look at the title. Just to let you know, baking is not my strongsuit. On top of that, I always add this or that or swap one type of ingredient for another. I eyeball my ingredients too. Yep, that looks like a teaspoon. If I was paying attention to the fact that I was supposed to be making biscuits, I would not have substituted half of the all-purpose flour with whole wheat flour. I would not have added ground flax seed either.

I continued on and luckily I had a set of unopened biscuit cutters that were bought for some unknown reason at some unknown time. I've never used any type of pastry cutter before. I actually need to purchase one of those pastry blenders I keep reading about in recipes. The two knives method isn't working so well.
The biscuits tasted good but were a bit tough. They were not fluffy or flaky like biscuits should be. And of course they were a bit grainy. The orange-honey butter that I put on them was very yummy, though. I feel sure that they would have been wonderful if I had followed the recipe, so here it is. I found it in my 2003 November issue of Cooking Light on page 176. I use whole nutmeg and grate it with a microplane. Freshly ground tastes much better and lasts longer than the alternative.

Pumpkin Biscuits with Orange-Honey Butter
2 cups all-purpose flour
3 tablespoons sugar
2 teaspoons baking powder
1 teaspoon ground cinnamon
1/2 teaspoon baking soda
1/2 teaspoon salt
1/4 teaspoon ground nutmeg
1/4 cup chilled butter, cut into small pieces
3/4 cup fat-free buttermilk
1/2 cup canned pumpkin
Cooking spray
1/4 cup Orange-Honey Butter
1. Preheat oven to 450 degrees F
2. Lightly spoon flour into dry measuring cups, and level with a knife. Combine flour and next 6 ingredients (flour through nutmeg), cut in chilled butter with pastry blender or 2 knives until mixture resembles coarse meal.
3. Combine buttermilk and pumpkin, add to flour mixture, stirring just until moist. Turn the dough out onto a lightly floured surface, knead lightly 5 times. Roll dough to about 1/2-inch thickness. Cut into 12 biscuits with a 2 1/2-inch biscuit cutter. Place the biscuits on a baking sheet coated with cooking spray. Bake at 450 degrees for 11 minutes or until golden brown. Serve warm with 1/4 cup Orange-Honey Butter. Yield: 12 servings (serving size: 1 biscuit and 1 teaspoon butter).
Orange-Honey Butter
Store in the refrigerator for up to 2 weeks.
1/2 cup butter, softened
1/2 cup honey
1/2 teaspoon grated orange rind
1. Combine all ingredients in a medium bowl, and beat with a mixer at medium speed until well blended. Yield: 1 1/4 cups (serving size: 1 teaspoon).
Subscribe to:
Posts (Atom)