
Showing posts with label Italian. Show all posts

Wednesday, June 25, 2014

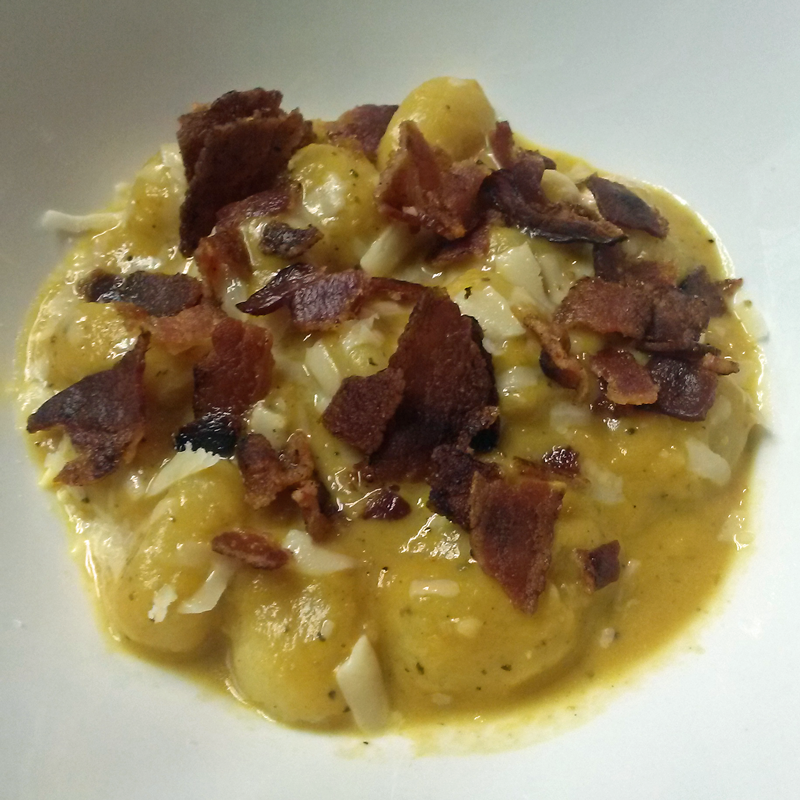
Gnocchi with Pumpkin, Parmesan and Bacon


So, it is officially summer here in North Alabama, and it is hot. Actually, today wasn't so bad, because we had some light storms coming through to give us some cloudiness and nice breezes.

Anything pumpkin makes me think of Fall and hearty meals, but tonight I just needed to find something to fix for dinner in a pinch, and it was slim pickins' in my kitchen. So, a hearty, fall meal in the heat of summer it was.

I had three quarters of a can of pureed pumpkin (I keep it on hand now to mix with yogurt and cinnamon for my toddler...got to get some veggies in that kid somehow) and a few slices of bacon that needed to be used, so I headed to the computer to see if those things went together in any kind of way and hopefully with pasta or gnocchi (the gnocchi needed to be eaten soon too). I found this pasta dish, and it set my mind a whirl, so I headed into the kitchen to start whipping up some food.

When I told my husband what I was planning to make, he made a horrible face. I guess pumpkin isn't his thing.  Now, if you aren't a pumpkin lover, never fear. Honestly, I don't like the taste of pumpkin straight up either. I usually only eat it as a pie or mixed with cheesecake around Thanksgiving. Except for the color of the sauce to give it away, you wouldn't know this was a pumpkin-based sauce. Great, comforting meal complete with a veggie, but even better because you can't really taste the vegetable.

Thanks to Tastefully Simple's Garlic Garlic and Onion Onion seasonings, I didn't have to chop a thing!

Pumpkin sauce before adding the cream and cheese
 (adding some more broth to this would make a yummy soup)

Gnocchi with Pumpkin, Parmesan and Bacon

Bacon, 4- 6 slices
Butter (just a pat)
Tastefully Simple's Onion Onion, about 1/2 tbs (or you could use about a 1/4-1/2 of an onion of your choice, chopped)
Tastefully Simple's Garlic Garlic, 1-2 tsp (or feel free to use some fresh garlic)
Smoked Paprika, just a pinch
Ground and dried chipotle pepper, just a pinch
Dried sage, 1/2-1 tsp
Dried thyme, 1/8-1/4 tsp
Dried basil, just a wee pinch
Sherry cooking wine, just a splash (um, I guess about a tbs or so)
Water, about 1/4-1/2 cup
Better than Bouillon Chicken Base, 1-2 tbs (feel free to use chicken stock or broth instead)
Water, about 1/2 cup (to mix with chicken base)
Pureed pumpkin, about a cup or so (I used 3/4 of a standard can)
Package of gnocchi (found on the pasta aisle)
Parmesan cheese, finely grated (about 1/4 cup)
Heavy cream, about a tbs
Salt and black pepper to taste

Cook the bacon in a large pan until crispy and set aside. You will leave some of the bacon grease in the pan to cook with, but if you think there is too much, just use some paper towels to blot some of it up out of the pan.

Turn down the heat to medium-low and add a pat of butter to the bacon grease.  Add the Onion Onion through the dried basil and stir.  Let the seasonings heat up gently in the pan for a few minutes (mine took on a nice, golden color).

Add a splash of sherry cooking wine to deglaze the pan; I used a silicon whisk to get all the yummy bits from the bottom of the pan. Increase the heat a little and add the water and Better than Bouillon Chicken Base. Stir well.  Add the pumpkin and stir again. I let mine simmer for 20-30 minutes.

While the sauce is simmering and getting very yummy, cook the gnocchi according to the package directions.

Add the Parmesan cheese to the sauce and stir thoroughly until the cheese melts. Add the cream and stir. Season to taste with salt and pepper and serve warm, adding the crumbled bacon on top with each serving and a little more freshly-grated Parmesan. Enjoy.


Saturday, December 28, 2013

Pasta with Pecan and Broccoli Pesto


Pecan and Broccoli Pesto? Yes, and it was quite tasty!

Following all the Christmas food this week, I was craving Chinese food. Then I was sick of that tonight and wasn't feeling well enough to go grocery shopping, so I had to come up with something to make out of what we had available at home. I knew I was going to make some type of pasta dish, and I didn't have much meat available to use (I found out after I started cooking that we had bacon...I'll use that tomorrow).

We have lots of pecans right now, so that I was going to put those in there somehow, and we have lots of frozen broccoli. I had one lemon left, plenty of cheese, and some pasta.  I did my usual scanning over recipes online with some of these ingredients and came up with the pesto.  Since I didn't use a whole lot of broccoli, we weren't really able to tell it was there.  I roasted the pecans before adding them to the pesto mixture, and the nuttiness of the dish was divine and very filling.  Whole wheat pasta of some sort would have paired nicely, but I was all out of it.  The bucatini I used is like a thick spaghetti with a hole through the middle. It is the closest thing I've found to Pici, a traditional Tuscan pasta, while grocery shopping.

I had a few frozen shrimp left (pre-cooked...I should really pay more attention to labels these days), so I heated some butter in a pan and tossed the thawed, pre-cooked shrimp for a minute or so and served those with the pasta. The sweetness of the shrimp went nicely with the nutty pasta. This dish may seem a little complicated, but it came together rather quickly. My husband approved; however, my two-year-old son wouldn't even try it. He settled for Chef Boyardee. *sigh*


Ingredients:

Pecans (I used whole pecans...from my freezer)
Pasta of your choice (I used Bucatini...from Giada Laurentis' brand at Target)
Extra Virgin olive oil 
1-3 canned anchovies in oil (omit these if they totally gross you out, but I urge you to give them a try)
Red pepper flakes (as many to satisfy your desired heat level)
Salt and black pepper to taste
1-2 cups broccoli florets (I used frozen)
1-2 tablespoons garlic, minced 
Pecorino or Parmesan cheese, grated (I used Pecorino, but I was torn as to which to use)
Juice from 1/2 to 1 whole lemon
Zest of one whole lemon


Directions:

1.  Place your pecans on a pan (I line mine with foil) and toast them in the oven or toaster oven for about 10 minutes on low heat (about 200-250 degrees F).

2.  Bring a pot of water to boil for your pasta. Cook the pasta according to the package directions.

3. While the pecans are toasting and the pasta is cooking, make the pesto.  Heat a few 2-3 tablespoons of olive oil in a medium-large non-stick pan over medium to medium-high heat.  Add the anchovies and stir until they break down into the oil.  Add red pepper flakes (I added just a tiny bit at this stage, because I served this to my two-year-old.  My husband and I topped off our pasta with an extra sprinkle or two right before we ate it), black pepper, and some salt and reduce heat to medium-low.  Add the garlic and the broccoli and cook for 2-3 minutes (longer if your broccoli is still frozen...I thawed mine first).

4. Zest your lemon and place the zest aside.  Using a blender, food processor, etc... blend the broccoli/garlic/anchovy mixture with 3/4 of your toasted pecans, juice of half the lemon, cheese and more olive oil as needed to aid the blending process.  Set the pesto aside.

5. Chop the remaining pecans into small pieces and set aside.

6. When the pasta is finished cooking, use a coffee cup or some other heat-safe container to scoop out some of the starchy cooking liquid. Set this aside and drain the pasta.

7. Heat the pan you cooked the broccoli mixture in to medium-low heat, and then add the pasta, pesto (as much as you think you need...I had some left over), some of the starchy pasta water, and a little more lemon juice. Mix well. 

8. Turn off the heat and add the lemon zest. Toss, and then taste to see if you need to add more salt or pepper. 

9.  Before serving, sprinkle the pasta with the reserved pecans you chopped (I like a little crunchiness to my dishes sometimes).

I served this with shrimp, but I think this would be lovely alongside some type of grilled while fish, such as Tilapia or Grouper.

I actually forgot to add the cheese to the pesto at first, and the pesto tasted pretty good without it.  So, this would make a nice vegan pasta dish as well.


Monday, September 16, 2013

Homemade Eggplant and Salami Pizza


Well, sort of homemade. I start with a refrigerated dough (Pillsbury-brand thin crust). This is always so yummy. I don't know why I don't make this more often, because it is not difficult and not that time consuming.

For some reason that I can't remember, my husband and I started putting eggplant on our pizzas at home. Thinly sliced zucchini is good as well, but I just love the taste of eggplant.  Eggplant and tomatoes are always a good combination.  Add in some cheese and you've got a winning combo.

The best part of my homemade pizza is probably the sauce:

(I'm an add this and that sort of cook, so I rarely measure)

Splash of extra virgin olive oil
1/4-1/2 onion (white or yellow), chopped
Tomato sauce
Tomato paste
Roasted red peppers (I buy jars of already roasted peppers...cheaper and quicker), chopped
Crushed red pepper flakes (to taste)
Salt/freshly ground pepper (to taste)

Saute the onions in the olive oil until they are translucent.  Add in some tomato sauce and paste and stir well and bring to a slight boil.  Add in the roasted red peppers, pepper flakes, and salt/pepper.  Boil for a minute or so and then lower heat and allow it to simmer for a few minutes.

Puree mixture and keep it warm until you are ready to add it to your pizza.

I like my sauce a little spicy. I think it works well since the pizza crust I buy has a slightly sweet taste.

For the pizza in the picture, I made half with eggplant and half with salami.

I baked the sliced/peeled the eggplant and then sprinkled it with salt and left it in a large colander for 15-30 minutes.  I rinsed it off well and then baked it and the salami in a 375 degree oven for a few minutes before cooking the pizza crust.  I wanted the salami a bit crispy and the eggplant to be cooked through (the pizza once assembled doesn't bake very long).

The crust pre-bakes for a few minutes, and then you pull it out of the oven and add your toppings. I put down the sauce, a little cheese (Italian blend), the vegetables/meat and then more cheese.  I added mozzarella on top of the eggplant and feta on top of the salami.

You can also sprinkle red pepper flakes on top of the vegetable/meat instead of (or in addition to) putting them in the sauce.

Wednesday, July 20, 2011

A Taste of Florence: Yellow Pepper Soup

When Lee and I were in Florence, Italy we ate at the Cibreo cafe. It is connected to the main Cibreo restaurant and serves some of the same food but is less expensive. A local gave us the tip to go there instead of the restaurant. She told us just to be there right when it opened because the cafe didn't take reservations. Fortunately eating somewhere in Italy right when they open for dinner isn't like rushing to a restaurant here right when it opens and having to eat at 4:30 PM. Cibreo cafe didn't open for dinner until 7:30 PM.

It was one of the best meals, if not the best, we ate during our two-week stay in Italy. I wanted to eat at Cibreo after reading great reviews in travel books and online. One thing it is known for is yellow bell pepper soup. I was really looking forward to trying it but it wasn't on the cafe's menu. I did have their tomato-bread soup and it was divine. It was a very thick pureed soup with loads of flavor. When I came back from Italy I did an online search for yellow pepper soup and found one that is supposed to be like Cibreo's. You can find it here.

I altered the recipe (I usually do alter recipes) a bit including omitting the spinach. It was delicious. It had a thick, creamy consistency like the tomato-bread soup I had at Cibreo and was filled with flavor. Because I omitted the spinach it was a beautiful yellow color. As you can see from the picture above, this time when I made it I added the spinach. It was not as visually appealing as my first batch, but man was it good! I also used one red bell pepper in addition to the yellow one because that is all I had on hand.


There are two ingredients in this soup that may sound a bit strange: nutmeg and lemon juice. Don't even think about omitting these! You will be amazed at what a difference just a touch of both makes to this soup. I add them both at the end after all the other ingredients are pureed and heated again. I also use white onion instead of red and red potatoes instead of yukon gold simply because that is what I usually have in the kitchen.


Looking at the recipe I used as a guideline, I noticed they call for 6 cups of veggie broth. Don't use this much. I used just enough broth (this time I actually used vegetable stock) to reach the top of the vegetables.

The second time I made this soup (this was my third attempt) it was a massive fail. I had taken it to a dinner party too. I think where I went wrong was adding too much broth. It just diluted the flavor of the vegetables. I'm glad I've redeemed myself with this soup tonight. As you can see from the picture I had more tomato bruschetta. The basil had gone bad, but it didn't need it. The tomato was so delicious.


If I ever make it back to Florence, and I sure plan on it one day, I am definitely going to try to taste the yellow pepper soup at Cibreo. Until then, I'll keep making it at home. It will be a great soup to feed to the baby when he starts eating solid foods since it is not too spicy or hot and packed full of veggies.


Tomatoes and Peaches

I am really enjoying both tomatoes and peaches this summer. For the last several nights Lee and I have started off our dinners with tomato bruschetta. It's like summer on a plate to me.

The picture above features bruschetta we actually grilled, but most nights I just toast up the bread in the toaster oven and get it in my mouth as fast as I can. It's real simple:

Slice some crusty bread and toast or grill it. If grilling it, use low heat and brush the bread with olive oil first. It only takes a minute or so on each side on the grill. Slice a good tomato (by good I mean a tasty one from your own garden or the farmer's market and not a supermarket tomato that tastes more like water than a tomato...heirlooms are great). I squeeze out most of the seeds before slicing. After slicing season with salt and pepper. Spread a thin layer of mascarpone cheese (ricotta, goat cheese, or a nice slice of fresh mozzarella would work too) on the toasted or grilled bread. Top with a slice or two of the tomato and then add some fresh basil and a drizzle of olive oil.


I have run across peach-tomato salsa in the past while searching the web but never tried it. Since I had tomatoes and peaches I needed to eat I decided to try it. It was pretty good. I'm not gonna lie...I was a bit skeptical. We ate it on top of grilled tilapia. I added onion to the salsa which turned out to be a mistake. Here is what I mixed together for the salsa minus the onion:

1 peach, peeled, pitted, and chopped
1 tomato, peeled, seeded and chopped (I used a yellow heirloom tomato)
1/2 to 1 jalapeno pepper, chopped finely ( I used a few rings from a jar)
1/4 to 1/2 tsp garlic, minced
1 tablespoon or so of chopped parsley (I'm sure cilantro would be very good as well)
drop of lemon juice
salt and freshly ground pepper to taste

Mix all the ingredients and place in the fridge until ready to eat. My tomato and peach were both very juicy so I had a very juicy salsa. It went very well with the grilled fish. Very light and summery.


What did I have for dessert that night? One yummy, juicy peach in all it's glory. I've been eating at least one peach a day. I bought them to grill and top with balsamic glaze and mascarpone cheese, but they are so good just as they are that I don't tamper with them.

Tuesday, June 28, 2011

Baked Feta in Tomato Sauce and a Simple Green Salad


Lee was out of town last night, so I was on my own for dinner and I was craving Italian food. I had some leftover Publix 5-grain Italian bread, plenty of tomato sauce (I buy it in bulk from Costco)and then I went back to Publix to pick up some fresh basil, feta cheese (pasteurized since I'm pregnant), spring salad mix, and some other goodies.

This was a really quick and yummy dinner to throw together.


Baked Feta in Tomato Sauce

Prepared tomato sauce (I used a little over half a 14 oz can)
Fresh basil, torn into small pieces (2-3 large leaves or equivalent in small leaves)
Red pepper flakes, 1/4-1 tsp depending on how hot you like it
Minced garlic, about 1/2 tsp
Salt and freshly ground pepper to taste
Small chunks of feta cheese, 1/4-1/2 cup
Extra-virgin olive oil, a tsp or so

Crusty bread for dipping

Preheat oven to between 375 to 400 degrees F or use a toaster oven like I did (no preheating required).

Place the first five ingredients in an oven-proof casserole dish (mine was about 3 1/2 to 4 inches wide) and stir. Place feta cheese on top of tomato sauce and drizzle with olive oil. Heat in the oven for 15 or 20 minutes. Stir and enjoy with pieces of crusty bread (I like to toast my bread for a few minutes on each side first).


This is one of my favorite ways to dress spring salad greens. The vinaigrette recipe below is appoximately what I made last night and was enough to dress 2-4 salads. You don't need much...just enough to lightly coat your greens.

Simple Green Salad

Juice of one large lemon
1-2 tsp red wine vinegar
Salt and freshly ground pepper to taste
Extra virgin olive oil, about 2 tsp
Spring salad mix
Capers
Freshly shaved parmesan cheese

Combine the first three ingredients in a small bowl (I usually mix my dressings in my 2-cup glass Pyrex measuring cup). While you whisk the first three ingredients, slowly drizzle in the olive oil. This is your vinagrette.

Top your spring salad mix with the vinaigrette, capers, and some freshly shaved parmesan cheese. Simple but delicious.

Thursday, January 6, 2011

Hazelnut-crusted Tilapia with Lemon Basil Cream Sauce and Italian-style Green Beans


The other night Lee and I went to Carrabba's with friends, and I ordered the Trout Nocciola...trout crusted in hazelnuts and served with a lemon and basil butter cream sauce. On the side, I had Italian-style green beans. It was delicious. Lee had spaghetti with Italian sausage, but he kept stealing bites of my trout, so I decided to attempt the dish at home the next day for dinner. I substituted tilapia for trout because it was less expensive. I'll go ahead and tell you that it was a success!

The most difficult and frustrating part of the meal was preparing the hazelnuts. I went ahead and popped open the wine to help get me through it. This was the first time I've cooked with hazelnuts, and I did not anticipate them being so much trouble. I love hazelnuts, so it was well worth it.


First, I had to shell the darn things. The only type of nutcracker I own is for pecans, and it wasn't up to the task, so I pulled out the meat pounder. It worked well. I wound up placing the nuts right onto the countertop, and if I hit them with just the right force and at a slight angle, they would open up leaving a beautiful intact hazelnut. Be prepared for a mess if you try this. Hazelnuts were flying everywhere. The dogs and the cat quite enjoyed it.

After shelling them, I had to remove the thin, paperlike skins. I saw online that toasting them in the oven for 10-15 minutes at 350 degrees F was the key, so that's what I did. This releases some of their oil and gives them a great flavor too. After they came out of the oven, I used a kitchen towel to rub off the skins. Most of them came off easily, while a few didn't budge. If there was just a tiny bit of skin on one, I just scraped it off using my nails under the towel.

I pulled out the meat pounder again to crush them. I placed a few hazelnuts in the towel to keep them from flying off and pounded away. After a few pounds, I placed the nuts on a wooden cutting board and just pressed firmly with the meat pounder to achieve a finer consistency. Whew!


The wine I chose for tonight was Orvieto Classico. Orvieto is located in Umbria, which is adjacent to Tuscany. It was located among the Pinot Grigios, which was what I initially had in mind, but I decided to try something new. It was alright, but I think I prefer Pinot Grigio.


After I got the hazelnuts ready, I started making the sauce. I'm pretty handy with sauces, so this was a snap. Here's what I did:


Lemon Basil Cream Sauce

2 tbs salted butter

1-1 1/2 tbs freshly squeezed lemon juice

1 tbs vegetable stock (chicken stock or broth would work well also, I just had some leftover veggie stock handy)

1-1 1/2 tbs white wine

freshly ground black pepper to taste (optional...I add black pepper to everything)

1/2 tsp garlic, minced

1/2 cup heavy whipping cream

1-2 tsp lemon zest

1-2 tbs fresh basil leaves, torn


Melt the butter in a small pot over medium heat till slightly golden brown. Add the lemon juice, vegetable stock, wine, black pepper and garlic and cook on medium-low for 10-15 minutes or until reduced by about half. Whisk in cream until combined and reduce heat. Add lemon zest and stir. Sauce will thicken somewhat after it starts to cool. If it isn't as thick as you would like, you can thicken it up by first mixing some cornstarch or arrowroot (my favorite sauce thickener) with cool water and adding it to the sauce. If you add a thickener, bring the sauce back to a boil, and then reduce it again.

Add the basil to the sauce right before serving or just place it on top of the sauce when you plate (that's what I did). Since I still had to cook the fish and green beans, I left the sauce on the lowest setting to keep it warm.

(Serves 2-4)


Hazelnut-Crusted Tilapia

2-3 tbs extra virgin olive oil

1/2-3/4 cups toasted and crushed hazelnuts

1/2 cup panko (optional)

salt and freshly ground pepper to taste

1 egg white, whipped slightly

2 tilapia filets

1-2 roma tomatoes, seeded and cut into strips or chunks


Heat a medium-large size pan with lid on medium-high heat and add oil.

Dip fish into egg white and then into hazelnut/panko mixture, pressing so that it sticks. Place tomatoes into oil and stir. Add coated fish to pan and brown both sides. Reduce heat to medium or medium-low. Stir tomatoes and cover with lid. Cook for 5-10 minutes until fish is opaque throughout.

***I had to add additional oil to the pan, so next time I plan on adding some oil directly to the coated fish before placing in the pan.***

Serve fish hot covered with 1-2 tbs Lemon Basil Cream Sauce.

(Serves 2)


Italian-style Green Beans

1 tsp extra virgin olive oil

1 handful thin, French-style green beans (I buy them prewashed in bags)

1-2 roma tomatoes, seeded and roughly sliced or chopped

1-2 cloves pickled garlic, thinly sliced (use regular garlic if you don't have pickled)

salt and freshly ground pepper to taste

1/2 tbs or so balsamic vinegar (or other vinegar such as red wine vinegar)

1-3 tbs water, depending on how tender you like your green beans

Heat oil in medium-sized pan over medium to medium-high heat. Add beans, tomatoes, garlic, and salt and pepper. Heat for 1-2 minutes, tossing occasionally. Add vinegar to deglaze pan and stir. Add water and cover with a lid, but leave it cracked just a bit so it steams. Cook until desired tenderness and serve hot or even at room temperature.

(Serves 2)

***I usually steam my green beans in the microwave, but we have been without one for several months. We are getting one built in over the stove, but it is requiring custom cabinetry, so it has become a much bigger project than anticipated. Heating up leftovers isn't as quick without one.***

This turned out to be a delicious meal worthy of serving to guests. The next time I make it I'm going to try to lighten it up a bit by omitting the cream and making a broth and wine-based sauce instead. I'll let you know how it goes.